
There are many tutorials out there that teach you how to get started in Flutter for mobile. But resources on Flutter for desktop are still lacking. Today I will walk you through the steps of creating a Hello World! App on Flutter Desktop.
Note: The following commands have been tested on Linux and MacOS only, since those are the OSes that I personally use.
Setting up Flutter for Desktop
First install Flutter for your desktop operating system. You can find instructions for installation at the following links:
Because Flutter Desktop is still in Alpha, we have to switch to the dev channel.
flutter channel dev
flutter upgrade
Then we switch to enable desktop. Notice that the flags for Linux, MacOS and Windows are different. Run the command that is relevant to the operating system you are currently using.
flutter config --enable-linux-desktop
flutter config --enable-macos-desktop
flutter config --enable-windows-desktop
Check that your OS is listed by running the following command:
flutter devices
Then create the scaffold for your initial application, and run it to test
flutter create example_app
flutter run
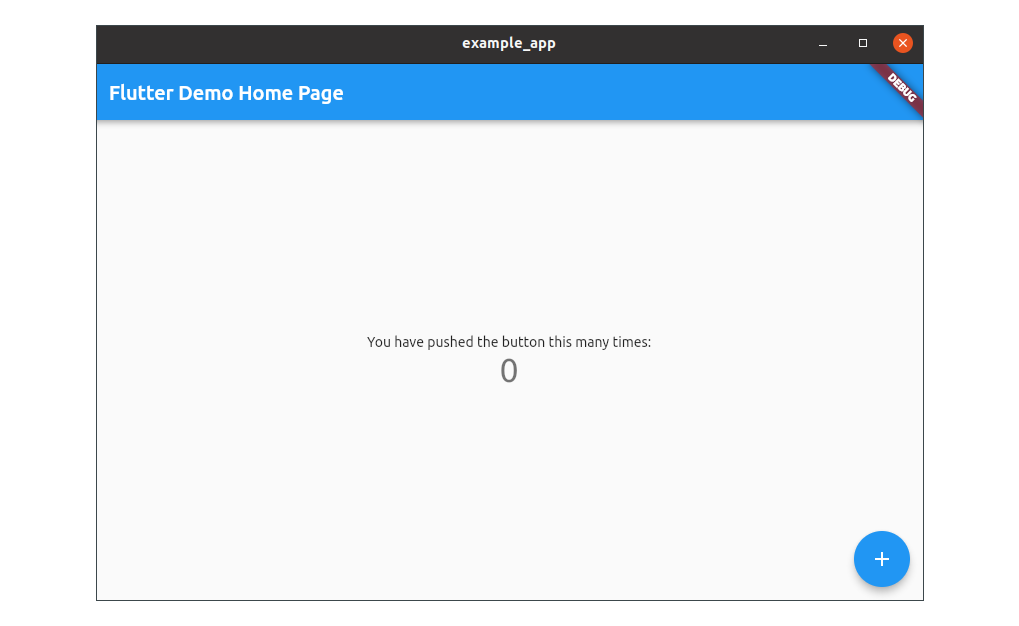
It works!
A souped-up Hello World app
All Flutter applications are written using Dart. When building for each platform, Flutter compiles Dart down into native code, which makes Flutter applications highly performant. This is also true for Desktop Apps.
If you are familiar with and have developed mobile or web applications in Flutter, the lib/ folder should look very familiar. In fact, it is exactly the same whether you develop in mobile, web or desktop! In such a case, you know all you need to know to carry on by yourself.
If not, let’s dive in with an example. This example is a little bit larger than the usual hello world, because I have included several Flutter features that I think are really useful in actual development work.
Replace the generated code in lib/main.dart, with the following:
Let go through this code step-by-step.
import 'package:flutter/material.dart';
Widgets are the fundamental building blocks in Flutter. Almost everything that the user sees in Flutter applications is a widget. When we import the material.dart library, we are importing a variety of widgets that come with Flutter, including buttons, lists, tabs, anything you can think of that goes into an application. Without widgets we cannot build anything in Flutter.
void main() {
  runApp(ExampleApp());
}
The main function is the entry point to your application. It renders the root widget using runApp, in this case the ExampleApp widget.
class ExampleApp extends StatelessWidget {
  @override
  Widget build(BuildContext context) {
    ...
  }
}
There are two important types of widgets in Flutter, the StatelessWidget and the StatefulWidget. We use the former when there is no need to keep track of state, and the latter when state is involved. Because we have no need to keep track of state in this basic application, we will use StatelessWidget.
We define the class ExampleApp by extending from StatelessWidget, and override the build method. This method has to return a widget, whether stateful or stateless.
...
  return MaterialApp(
    title: 'Flutter Demo',
    theme: ThemeData(
      primarySwatch: Colors.blue,
    ),
    home: HelloWorld(),
  );
...
In this case we return MaterialApp, which is a widget that encapsulates many of the UI/style approaches that are exhorted by Google’s Material Design design system.
This widget has a home property, which is where we return the meat of our hello world example, itself defined as a StatelessWidget.
class HelloWorld extends StatelessWidget {
  @override
  Widget build(BuildContext context) {
    return Scaffold(
      appBar: AppBar(
        title: Text('Flutter Example App'),
      ),
      body: Container(
        alignment: Alignment.center,
        child: Text(
          'Hello World!',
          style: TextStyle(
            fontSize: 70,
            fontWeight: FontWeight.bold,
          )
        ),
      )
    );
  }
}
There are a few things to unpack here.
Scaffold is another Material widget that serves as a scaffold (duh!) for material design widgets common in many applications, like app bars, floating application buttons, etc. These are provided as arguments to Scaffold, like AppBar, which I have included for illustrative purposes.
Let’s have a look at the body argument. This is where the content of the application is usually found. We encapsulate our content in a Container widget. This widget has multiple arguments, but we choose to set two: alignment and child. The latter is where our ‘Hello World!’ can be found, encapsulated by a Text widget.
Hot Reload
Once the above code has been input into lib/main.dart, switch back to the terminal and do a hot reload by pressing r. Hot reloading is a cool feature that comes built in with Flutter that allows developers to re-render the UI after code changes, without needing to restart the application.
Switch to your application, and you should see the following:
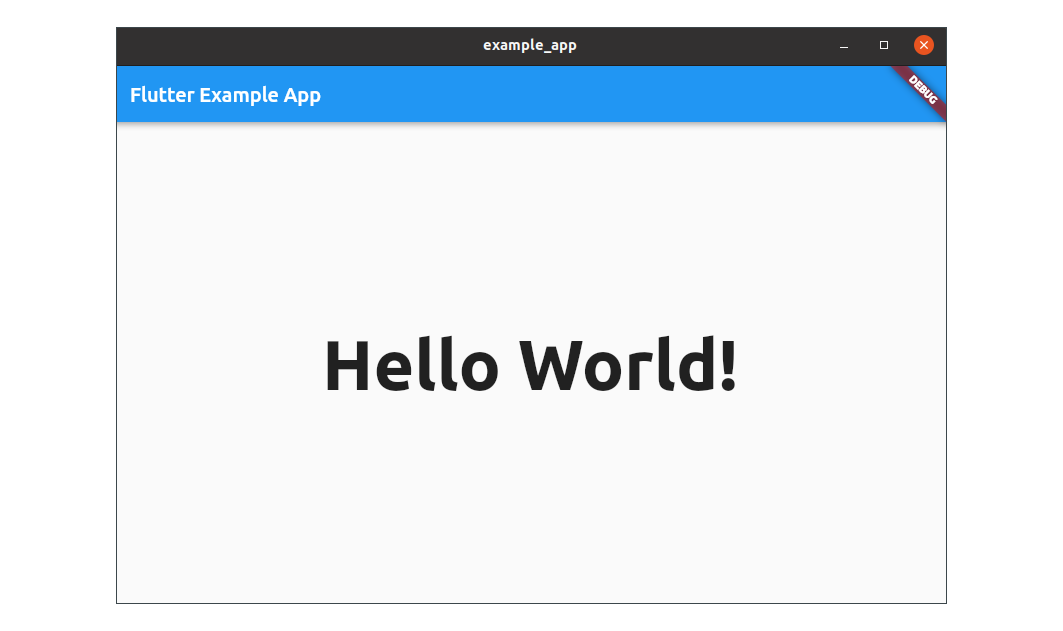
Congratulations! Your Hello World Desktop App is now ready, courtesy of the dev team at Flutter.
Further Readings
Development in Flutter is a relatively large topic. Because development in Mobile and Desktop are essentially almost the same when it comes to the core library, the many resources out in the wild applicable to mobile should also be applicable to desktop development.
So I believe it best to point you in the right direction with a few resources:
- The official Flutter documentation
- A language tour of Dart
- StatelessWidget vs StatefulWidget
- Why should I ever have to use StatelessWidget?
Have fun developing applications in Flutter!