
Dec 2022 Edit – Due to a significant amount of interest, readers can find a ready-made PyPI package here.
Introduction
Building efficient event buses requires strong support for parallel processing. This is because scalable event buses usually require multiple events be fired in parallel, and these events should not block each other’s execution during extended input-output (I/O) operations.
Python is by default single-threaded, using a single core for processing. This means that building an event bus in python used to require the heavy use of multithreading, with its attendant complexities and pitfalls.
However, with the advent of asyncio, and its JavaScript-esque async-await syntax, things are very different. Below I will describe how we can use asyncio to build an efficient event bus.
If you want to have a look at the code I use in this post, you can find it on Github here.
The Event Bus — Core Components
Before we dive into the code, let us examine the components that make up an event bus.
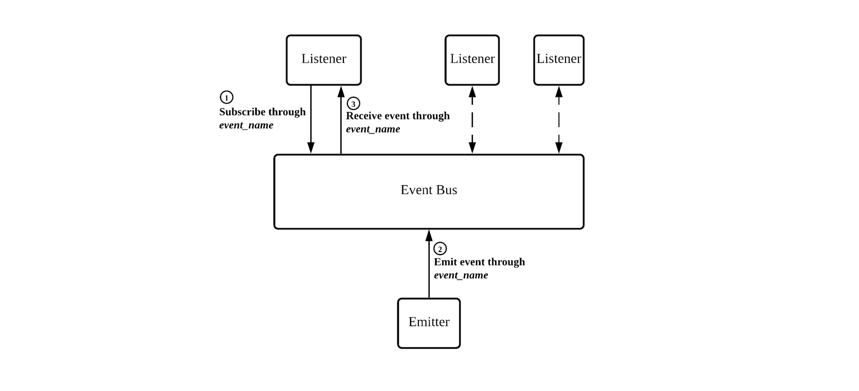
An event bus is an important piece of the event-based architecture puzzle. It is the middleman, with the responsibility of matching the correct event generator (emitter) to the correct event consumer (listener), through an event identifier or key (event_name).
So an event bus requires:
- A way to add and remove listeners.
- A means to track what kind of events these listeners are interested in. These kinds of events are identified by a unique key, referred to above as the event_name.
- A way for event generators to fire events, and for these events to be matched directly to the listeners that are interested in them, through a unique key.
Event Bus Class
The above translates roughly into the following UML Class Diagram:
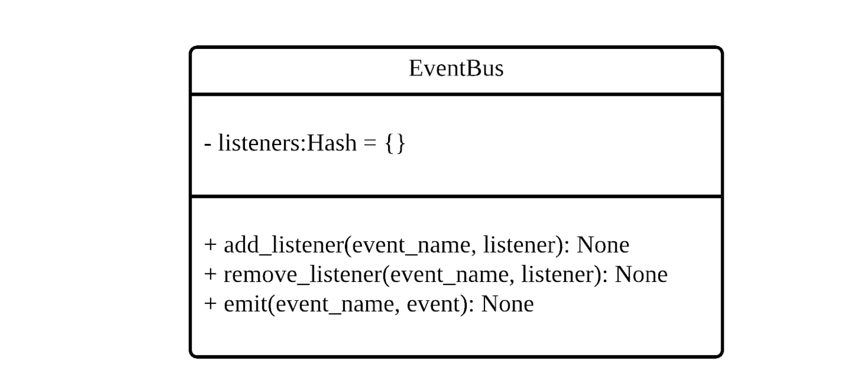
Which translates roughly into the following Python class:
class EventBus():
  def __init__(self):
    self.listeners = {}

  def add_listener(self, event_name, listener):
    # ...

  def remove_listener(self, event_name, listener):
    # ...

  def emit(self, event_name, event):
    # ...
For those familiar with NodeJS, the API above is modelled after its EventEmitter class.
Python implementation
Based on the above structure, the final implementation can be found below.
import asyncio

class EventBus():
  def __init__(self):
    self.listeners = {}

  def add_listener(self, event_name, listener):
    if not self.listeners.get(event_name, None):
      self.listeners[event_name] = {listener}
    else:
      self.listeners[event_name].add(listener)

  def remove_listener(self, event_name, listener):
    self.listeners[event_name].remove(listener)
    if len(self.listeners[event_name]) == 0:
      del self.listeners[event_name]

  def emit(self, event_name, event):
    listeners = self.listeners.get(event_name, [])
    for listener in listeners:
      asyncio.create_task(listener(event))
Some explanations.
Listener has to be an async function
Firstly, note that listener is actually an async function, rather than an object instance. This is in line with the NodeJS approach, and we call this function directly with the emitted event.
Each listener is added to a set
Next, we add each listener to a set, rather than a list. This allows for efficient lookup. This is possible because each function in Python has its own method address, which can act as a unique key. This naturally means that addition and removal are cheap, and has the added benefit of disallowing repeat listens by the same function.
Emit is not asynchronous
Notice that emit is not an async function. This is because we do not want to block the event bus’ loop while waiting for a fired event to return. Instead, we create a task, spinning off the subroutine returned when we call the listener. This way events can happen in parallel without blocking each other.
Conclusion
The above is a simple way to build up an event bus using async-await. It takes advantage of asyncio, which removes a lot of the complexity that used to be required to build event buses, by doing away with threads.
Again, if you want to have a look at the code I use in this post, I have it on Github here.